
Hi!
A return to OHW, pike and shot, renaissance rules with a scenario from the Bun Shop renaissance scenarios book.
I chose this one as it had a renaissance theme. I tried it with DBR but found it dissatisfying and went, again, with OHW.
The Pole's Tax.
The victory conditions were as follows:-
(1) Count normal casualties.
(2)Poles gain 200 points for looting the village. (One unit spends one turn in it not in melee or firing)
(3) Poles gain 25 points for burning each haystack. (To burn 1 figure must spend one turn at it, not moving or firing or in melee)
Obviously these are slightly at odds with the usual OHW victory conditions as is the number of units fielded. I dropped the 'last 2 units rule' as I wanted what I think is a more likely outcome. Losing 3 units, 1/3 of the force was deemed sufficient for the army to retreat. This worked well in these two games so I hope to remember to retain this rule!
I did add the following rules:-
(a) Morale check on first casualties. If rolling a 6 on a 6 sided die retreat, as if flinching from shock, by 6''
(b) When reaching 8 casualties another morale check with the same effect if a 6 rolled.
(c) Roll each movement phase in the army turn to rally for ability to resume in the engagement. Rolling a 6 as above.
I deliberately kept it simple in the spirit of the rules.
The scenario had the Polish raiding a Cossack village to collect extra taxes. likely they refused to pay the extra burden.
The forces were:-
Polish
1 x General
3 x Medium cavalry
3 x Medium cavalry
2 x Light cavalry
2 x Light infantry (treated as skirmish)
I made a change in the army composition, giving the Poles 2 extra medium cavalry.
Cossacks
1 x General
5 x Light cavalry
2 x Light infantry muskets (treated as skirmish)
1 Light infantry muskets/axe (treated as skirmish)
1 x wagon with light gun (there are no rules in the Pike and Shot rules in OHW. I used the usual firing/melee for infantry as it was a wagon)
Again, another change. I gave muskets to the 2 units of light infantry which in the scenario were improvised weapons. With the generally poor shooting I don't think it made a lot of difference to the outcome.
All the figures are from the Polish army I have.
The games (I fought two) were a lot more pleasant to game.
As you will note by the pictures, the Cossacks in the first game were trying to hold the enclosures from which the infantry could shoot and have some defence.
The cavalry were on the back foot due to the speed of the Polish advance.
It didn't help the Poles much! Although the Pole's did burn one of the haystacks.They suffered their first defeat after having 3 units reach 15 points.
In the second game I tried to defend the haystacks better with the cossacks. It worked to their advantage, creating a more defensible area. I wasn't really conscious of that when doing it! Again, they caused 3 Polish units to reach 15 points so won the game. I carried on with the game until the 4th unit succumbed. Three units seemed to be the right level of casualties.
The shooting throughout was nothing to write home about. The Cossacks and Poles are lousy shots!
The morale rule also worked well in both games. In the first game the Poles had 2 units retreat, one on 50% the second, slightly later on first casualties. In the second the Cossacks had 1 unit retreat on first casualties. So, not over done. The Poles couldn't reactivate their units to get them back into the fight. One unit was followed up and was routed/killed.
In the Cossack's case, one unit was followed up so didn't need to rally.
Which leaves the question:-
Should I make another rule?
In which a unit forced to retreat fights at reduced effect?
Game 1

Game 2
Two great games
A return to OHW, pike and shot, renaissance rules with a scenario from the Bun Shop renaissance scenarios book.
I chose this one as it had a renaissance theme. I tried it with DBR but found it dissatisfying and went, again, with OHW.
The Pole's Tax.
The victory conditions were as follows:-
(1) Count normal casualties.
(2)Poles gain 200 points for looting the village. (One unit spends one turn in it not in melee or firing)
(3) Poles gain 25 points for burning each haystack. (To burn 1 figure must spend one turn at it, not moving or firing or in melee)
Obviously these are slightly at odds with the usual OHW victory conditions as is the number of units fielded. I dropped the 'last 2 units rule' as I wanted what I think is a more likely outcome. Losing 3 units, 1/3 of the force was deemed sufficient for the army to retreat. This worked well in these two games so I hope to remember to retain this rule!
I did add the following rules:-
(a) Morale check on first casualties. If rolling a 6 on a 6 sided die retreat, as if flinching from shock, by 6''
(b) When reaching 8 casualties another morale check with the same effect if a 6 rolled.
(c) Roll each movement phase in the army turn to rally for ability to resume in the engagement. Rolling a 6 as above.
I deliberately kept it simple in the spirit of the rules.
The scenario had the Polish raiding a Cossack village to collect extra taxes. likely they refused to pay the extra burden.
The forces were:-
Polish
1 x General
3 x Medium cavalry
3 x Medium cavalry
2 x Light cavalry
2 x Light infantry (treated as skirmish)
I made a change in the army composition, giving the Poles 2 extra medium cavalry.
Cossacks
1 x General
5 x Light cavalry
2 x Light infantry muskets (treated as skirmish)
1 Light infantry muskets/axe (treated as skirmish)
1 x wagon with light gun (there are no rules in the Pike and Shot rules in OHW. I used the usual firing/melee for infantry as it was a wagon)
Again, another change. I gave muskets to the 2 units of light infantry which in the scenario were improvised weapons. With the generally poor shooting I don't think it made a lot of difference to the outcome.
All the figures are from the Polish army I have.
The games (I fought two) were a lot more pleasant to game.
As you will note by the pictures, the Cossacks in the first game were trying to hold the enclosures from which the infantry could shoot and have some defence.
The cavalry were on the back foot due to the speed of the Polish advance.
It didn't help the Poles much! Although the Pole's did burn one of the haystacks.They suffered their first defeat after having 3 units reach 15 points.
In the second game I tried to defend the haystacks better with the cossacks. It worked to their advantage, creating a more defensible area. I wasn't really conscious of that when doing it! Again, they caused 3 Polish units to reach 15 points so won the game. I carried on with the game until the 4th unit succumbed. Three units seemed to be the right level of casualties.
The shooting throughout was nothing to write home about. The Cossacks and Poles are lousy shots!
The morale rule also worked well in both games. In the first game the Poles had 2 units retreat, one on 50% the second, slightly later on first casualties. In the second the Cossacks had 1 unit retreat on first casualties. So, not over done. The Poles couldn't reactivate their units to get them back into the fight. One unit was followed up and was routed/killed.
In the Cossack's case, one unit was followed up so didn't need to rally.
Which leaves the question:-
Should I make another rule?
In which a unit forced to retreat fights at reduced effect?
Game 1
 |
| Poles at the top |
 |
| Polish force |
 |
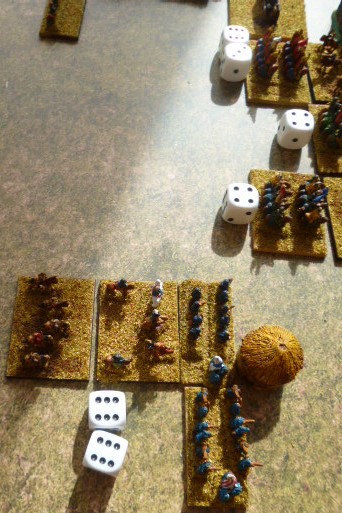
| A better view of the battlefield. First Polish casualties form musketry |
 |
| Polish left. Cossacks in the enclosure. Wagon defending the town |
 |
| Polish casualties with white die. Infantry reach the haystack ready to set it on fire. Polish horse engage the Cossacks in the enclosure |
 |
| Minimal damage |
 |
| View across the filed of battle. Cossack right wing light horse about to make their contribution |
 |
| Polish general under rear attack. Ouch! |
 |
| Double casualties! |

 |
| The Poles suffering all along the line. Polish left wing flanked |
 |
| After a flank and rear attack |
 |
| The unit reached over 8 casualties and broke off. |
 |
| Polish general's demise |
 |
| The Polish retreat |
 |
| New battle line for the Cossacks. Polish at the top |
 |
| First retreat for the Cossacks on first casualties |
 |
| The Cossack general rides to the rescue. Rear attack double casualties |
 |
| Polish infantry advance down the flank |
 |
| Sweeping round firing at the Cossack infantry |
 |
| Polish infantry sweeping round the right wing. Firing high, wide and handsome! |
 |
| The Cossack general charges again! The Cossack horse looking to outflank the Polish left wing |
 |
| The battle in the centre, Polish general in the rear waiting for a break through |
 |
| On the Polish right wing. Casualties from musketry mounting, slowly |
 |
| Cossack general's unit sustains casualties. |
 |
| View of the continuing battle. Polish casualties mounting. Polish light cavalry try to put pressure on their right wing |
 |
| Polish centre crumbling |
 |
| Crumbles some more |
 |
| Three Polish units gone and Cossacks holding firm. Polish infantry flanked and soon succumbed, being the 4th unit to go. |
I always expect the Poles to win battles. I will have to rethink that mindset!One of the reasons I think the Cossacks did well is the lack of difference in the status of the cavalry. Maybe the tactics of the cavalry prevented the heavier Polish units from fulfilling their steady advance, driving the light cavalry away?
I used the round huts of the Ancient British which looked very close to a haystack! Did you notice?
I used the round huts of the Ancient British which looked very close to a haystack! Did you notice?
No comments:
Post a Comment